Tutorial - Convert Photo to Bump Maps

UPDATED on November 14th, 2008 to work with ShaderMap CL 1.2.1
Here's a quick tutorial that will get you up-and-running with ShaderMap Command Line quickly. I'm using version 1.2.1.
1. Download and install ShaderMap CL. It is located in the downloads area of this site.
2. Create a directory on C: where you can store files you'll need for this tutorial. I called mine "C:\media"
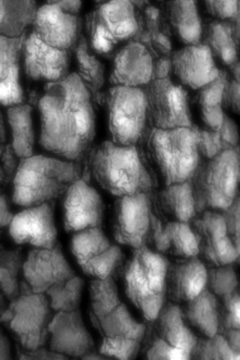
3. Save the following image ("bark.jpg") of tree bark into the directory.

4. Open a text editor and enter the following lines of code:
5. Save the file in the directory as "convert_it.bat". It is important that the file has the .bat extension. This tells Windows that it is a batch script.
6. Double click on the "convert_it.bat" file and ShaderMap CL will begin the conversion process.
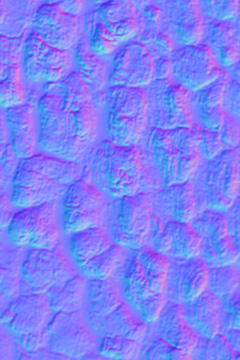
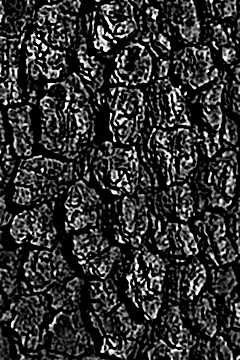
7. Look in the directory you created. There should be 3 new images: bark_DISP, bark_SPEC, and bark_NORM.
That's it!
For those of you who don't know how to write batch scripts, the first line of code changes the working directory to the ShaderMap CL directory where shadermap.exe is installed.
The second line of code starts shadermap.exe with a /WAIT parameter which tells the batch script to finish this command before moving onto the next. And most importantly is also passes the ShaderMap parameters for converting bark.jpg to displacement, normals, and specular - each with their own sub parameters.
You can learn more about the command line parameters for ShaderMap CL in the documentation included with CL.
Here's a quick tutorial that will get you up-and-running with ShaderMap Command Line quickly. I'm using version 1.2.1.
1. Download and install ShaderMap CL. It is located in the downloads area of this site.
2. Create a directory on C: where you can store files you'll need for this tutorial. I called mine "C:\media"
3. Save the following image ("bark.jpg") of tree bark into the directory.
4. Open a text editor and enter the following lines of code:
CD "C:\Program Files (x86)\ShaderMap CL 1.2.1"

START /WAIT shadermap.exe cdiff "c:\media\bark.jpg" -disp (*,*,*,*) -norm (*,*,*,*) -spec (*,-20,70,*) -v
5. Save the file in the directory as "convert_it.bat". It is important that the file has the .bat extension. This tells Windows that it is a batch script.
6. Double click on the "convert_it.bat" file and ShaderMap CL will begin the conversion process.
7. Look in the directory you created. There should be 3 new images: bark_DISP, bark_SPEC, and bark_NORM.
That's it!
For those of you who don't know how to write batch scripts, the first line of code changes the working directory to the ShaderMap CL directory where shadermap.exe is installed.
The second line of code starts shadermap.exe with a /WAIT parameter which tells the batch script to finish this command before moving onto the next. And most importantly is also passes the ShaderMap parameters for converting bark.jpg to displacement, normals, and specular - each with their own sub parameters.
You can learn more about the command line parameters for ShaderMap CL in the documentation included with CL.